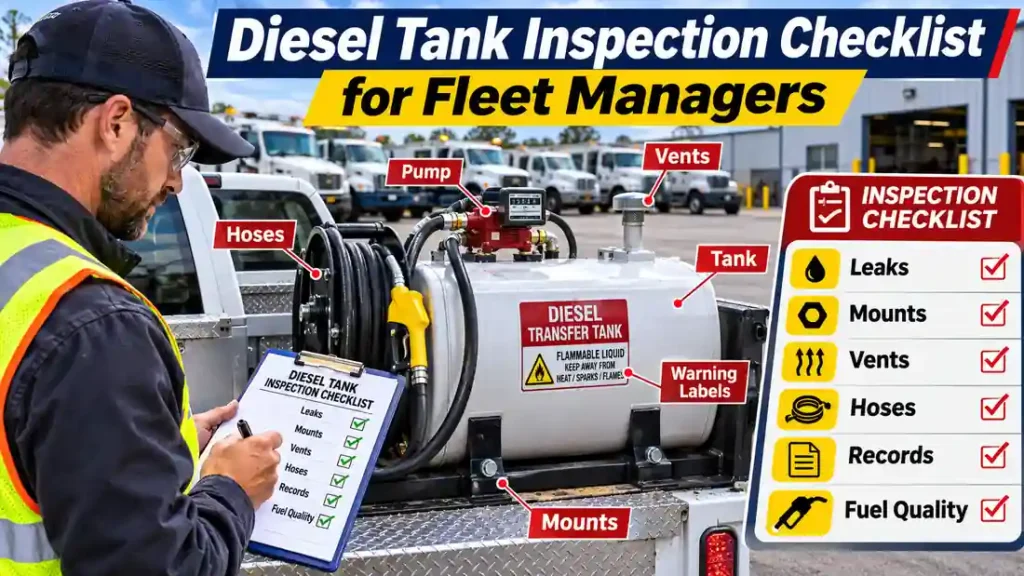
First, Identify Which Diesel Tank You Are Inspecting
I do not use one inspection standard for every container labeled “diesel.” A service truck’s engine fuel tank, a removable transfer tank, a fixed bulk-storage tank, and a DOT specification cargo tank can fall under very different design and inspection rules.
| Tank or equipment type | Typical role in a fleet | My main inspection focus | Regulatory distinction |
|---|---|---|---|
| Vehicle engine-supply tank | Feeds the truck’s engine | Leaks, brackets, fill cap, lines, crash or road damage | Vehicle fuel-system and maintenance rules may apply |
| Pickup-bed diesel transfer tank | Dispenses fuel to equipment | Shell, welds, mounts, pump, vent, nozzle and hose | Not automatically a DOT specification cargo tank |
| Stationary aboveground diesel tank | Yard fueling and backup supply | Shell, supports, containment, piping, vents and overfill control | SPCC and applicable fire/local rules may apply |
| Portable diesel can or fuel caddy | Small-volume refueling | Closure, spout, pump, damage, labels and storage | Portable-container and transport rules vary |
| DOT specification cargo tank | Bulk transportation | Specified examinations, leakage/pressure tests, marks and records | Formal inspection/test requirements under 49 CFR Part 180 may apply |
Before checking a tank, I record its manufacturer, model, identification number, capacity, fuel type, location, and intended service. If markings are missing, the tank has been modified, or its purpose is unclear, I flag it for review.
I also keep the diesel can transportation rules nearby for staff who move portable containers between jobs. I would not assume a tank is legal for highway transport just because it fits into a pickup bed.
Diesel Tank Technical Inspection Reference Table
These are useful inspection parameters, not generic pass/fail engineering limits. I use the tank maker’s instructions, the applicable code, and qualified inspection criteria for actual acceptance decisions.
| Item | What to verify | Why it matters | Action when abnormal |
|---|---|---|---|
| Tank identification | Plate/label, design and fuel compatibility | Establishes approved service and inspection path | Hold for identification if critical data are missing |
| Shell and welds | No cracking, wet seams, distortion or severe corrosion | Possible loss of containment or strength | Stop use; specialist assessment |
| Mounting and supports | Correct hardware, no loose or bent mounts | Vibration and loads can fatigue a tank | Stop if insecure; qualified repair |
| Filler cap and vent | Original approved parts, intact and unobstructed | Filling and dispensing create pressure/vacuum changes | Remove from use if safety is uncertain |
| Hoses and valves | No chafing, swelling, seepage or damaged guards | Failures can release fuel during transfer | Isolate leaking equipment immediately |
| Pump and wiring | Correct ratings, secure connections and protective devices | Controls transfer, fire and electrical hazards | Qualified service before next operation |
| Containment | No fuel accumulation; drain controls intact | Limits environmental consequences | Contain and report as required |
| Fuel quality | No unexplained water or sediment indications | Contamination can damage engines and pumps | Investigate and sample using approved methods |
| Records | Current inspections, repairs, tests and open defects | Prevents missed due dates and recurring failures | Assign an owner and closeout date |
I will not invent a universal minimum tank-wall thickness, maximum acceptable dent, pressure-test setting, or allowable leak rate. Those numbers are design-specific. I particularly avoid treating a homemade air-pressure check as a substitute for an approved tank test.
My Three-Level Fleet Inspection Schedule
The first improvement I would make in a busy yard is to give inspections an owner and a purpose. A pre-use check looks for obvious danger. A planned maintenance inspection looks for developing defects. A formal inspection determines whether a regulated or damaged tank remains fit for service.
| When | Who I would assign | Suggested focus | Record |
|---|---|---|---|
| Before use or fueling | Trained driver/operator | Wetness, visible damage, caps, hoses, mounts, unsafe conditions | Simple check and defect report |
| Weekly | Fleet lead or designated technician | Repeat defects, accessible underside, pump/nozzle condition, mounting | Short checklist with photos |
| Monthly | Maintenance team | Corrosion trends, labels, access, containment, records and corrective work | Asset-based inspection log |
| After impact, leak, repair or unusual pressure symptoms | Qualified service personnel | Damage-specific assessment and return-to-service criteria | Work order and approval |
| At required formal interval | Qualified inspector as required | Applicable integrity, cargo tank, or other prescribed testing | Signed report and next due date |
Important: This cadence is my recommended management routine, not a claim that every tank legally requires a weekly or monthly inspection. For a covered stationary facility, the SPCC Plan and relevant industry standard determine the program. For a specification cargo tank, inspection and test intervals follow its applicable DOT requirements. Vehicle inspections also depend on the fleet’s governing motor-carrier rules.
The 18-Point Diesel Tank Walkaround Checklist
I would put this checklist on a clipboard, tablet or equipment inspection form. The operator should be able to mark Pass, Attention, or Stop beside each line, then attach a photo if something looks wrong.
| # | Inspection point | What I look for | If something is wrong |
|---|---|---|---|
| 1 | Tank ID and assigned use | Correct tank, fuel and readable markings | Verify before use |
| 2 | Ground beneath tank | Fresh drips, stains or a diesel sheen | Stop and contain suspected leak |
| 3 | Visible tank walls | Bulges, dents, cuts or damaged coating | Escalate; stop for structural concern |
| 4 | Welds and seams | Dampness, rust trails or hairline cracks | Remove from service |
| 5 | Bottom and low points | Corrosion, trapped water or abrasion | Qualified inspection if suspicious |
| 6 | Mounting feet and straps | Loose bolts, movement or cracks | Stop if tank is insecure |
| 7 | Guarding and truck bed | Rub marks, impact damage or contact | Correct cause and assess tank |
| 8 | Filler neck and cap | Secure original parts, no damaged gasket | Replace approved components |
| 9 | Normal vent arrangement | Visible damage or obstruction | Follow manufacturer procedure |
| 10 | Pump body | Wetness, loose mounting or unusual damage | Isolate if leaking |
| 11 | Suction and return lines | Chafing, cracks and poor routing | Service before dispensing if unsafe |
| 12 | Hose | Cuts, blisters, leaks and kinks | Replace damaged hose |
| 13 | Nozzle and swivel | Leaks, sticking lever or broken guard | Remove defective nozzle from use |
| 14 | Electrical connections | Damaged cables, exposed conductors | De-energize; qualified repair |
| 15 | Labels and emergency controls | Fuel marking and accessible shutoff | Correct before use when critical |
| 16 | Secondary containment | Collected fuel, damage or blocked drainage | Contain and investigate |
| 17 | Fuel quality indicators | Water alarms, unusual filter issues | Investigate; don’t guess |
| 18 | Inspection and repair status | No unresolved red flags or overdue required test | Do not release until resolved |
I instruct operators to inspect from a safe position, without climbing under unsupported equipment, opening a pressurized cap, disconnecting hoses, or removing guards. This visual checklist never replaces lockout, confined-space rules, qualified testing, or manufacturer procedures.
1. Look for Leaks Before You Touch the Equipment
I start at the ground because leaks often leave clues there before they become obvious at the tank wall. A new drip beneath a fuel hose or a dark patch beneath a fitting deserves attention. So do fresh wet streaks around seams and mounting hardware.
I try to determine the general area without putting a hand into a moving machine or loosening a suspect connection. Diesel can migrate along a bracket and drip somewhere away from the true source. If the leak is active or the origin is unknown, I stop fuel handling, keep ignition sources away, and arrange safe containment and assessment.


A useful practice is to photograph the affected area with a scale reference, the asset ID and the date. Then the maintenance team can compare the condition over time without relying on somebody’s memory.
2. Inspect Tank Shells, Welds and Mounting Points
A small crack at a mounting foot worries me more than a cosmetic scratch in sound paint. The mounting area carries load and vibration; repeated movement can extend a fatigue crack.
I look for distorted metal, rust bleed at seams, cracked weld toes, rubbing against the truck bed, missing isolation material specified by the manufacturer, and evidence that a bracket has shifted.
For steel tanks, corrosion can hide below mounting feet and under debris. For aluminum tanks, I watch weld areas and supports for fatigue. For fuel-rated plastic containers, I look for cuts, discoloration, brittleness and stress cracking.
My rule is to separate cosmetic defects from potential structural defects, then let a qualified professional make the decision when strength may be affected. If you need a deeper repair-or-replace discussion, read Can You Repair a Cracked Diesel Transfer Tank?.
I would never instruct a driver to weld, drill, glue or pressure-test a tank that has held diesel. Even an emptied tank may contain hazardous residues or vapor.
3. Check Caps, Vents and Overfill Controls
A transfer tank must be able to accommodate pressure and vacuum changes through its manufacturer-approved vent system. But that doesn’t mean the cap should be loose or someone should drill a hole in it.
I check that the correct cap and vent are present, accessible and not visibly damaged. I look for blocked screens or debris where the design calls for a protective opening. Any suspected malfunction goes to qualified service rather than an improvised “vent test.”
At the yard tank, I also check the condition and service status of applicable high-level alarms, overfill prevention devices and spill catchment. These are not all required on every small transfer tank, so I verify the equipment’s design and rules first.
For a focused explanation, see Do Diesel Transfer Tanks Need to Be Vented?.
4. Inspect Pumps, Hoses, Filters and Nozzles as One System
A sound tank can still create a spill through a damaged hose or loose pump fitting. I therefore inspect the entire transfer path: suction, pump, filter, meter if fitted, dispensing hose, swivel and nozzle.
I look for abrasion, cracked rubber, swelling, damaged guards, unsupported hose runs, weathered wiring and damp connections. I also verify the correct voltage and rated fuel compatibility from the product documentation.
If the pump sounds different or delivers less fuel than usual, I don’t immediately blame the motor. Restricted filters, poor voltage, a blocked vent or suction issues can produce similar symptoms. The system needs diagnosis without running it in an unsafe condition.
My Diesel Transfer Pump Options and Selection guide covers pump types and selection; the related Manual vs. Automatic Diesel Transfer guide explains why nozzle control and pump power are separate choices.
5. Look for Water, Sediment and Fuel-Quality Problems
Fleet managers sometimes focus entirely on visible leakage and forget that a tank can contain fuel while still harming equipment. Water, dirt, microbial contamination and incompatible fuel can contribute to plugged filters, injector problems and downtime.
I look for water-sensor warnings, repeated filter plugging, unusual sediment reports and unexplained changes in fuel appearance. I do not tell drivers to taste, sniff closely, or open questionable tanks to diagnose the issue.
If sampling or draining is needed, it should follow approved site procedures using trained personnel, suitable containers and the relevant safety controls. An apparently clean fuel sample alone cannot establish that a corroded tank is structurally fit for service.
I also pay attention to temperature. Heat and cold can change fuel behavior, expose weak seals and affect stored diesel. The related guide on Temperature Effects on Diesel Storage and Tank Durability is a useful follow-up for seasonal maintenance planning.
6. Inspect Containment, Drainage and Spill Readiness
For stationary storage, I check not only whether the tank leaks, but where fuel would go if it leaked. An intact tank above a damaged containment wall still creates a vulnerability.
My inspection includes visible condition of the containment structure, collected liquids, drain settings where applicable, access to spill materials, and whether staff know whom to notify. I want the spill kit to be accessible, stocked and suited to the actual fuel quantity—not buried behind empty pallets.
When a spill exceeds safe operator-level control, personnel should isolate the area and use the site’s emergency response procedures. I would never send an untrained employee into a large diesel release to “finish the checklist.”
When Does the Law Require More Than a Visual Checklist?
This is where I make fleet managers distinguish fleet procedure from legal inspection obligation.
For U.S. commercial motor vehicles, 49 CFR Part 396 includes inspection, repair and maintenance obligations. The driver vehicle inspection report rule in 49 CFR 396.11 generally requires reporting discovered defects for covered property-carrying operations; it does not universally require a no-defect written report after every trip. A vehicle fuel tank also has applicable design and installation rules, which are not automatically the rules for a separate truck-bed transfer tank.
For a DOT specification cargo tank, 49 CFR 180.407 establishes formal test and inspection requirements by configuration and service, with qualified inspectors, records and markings. For example, many cargo tanks have annual external visual inspection and leakage testing requirements and five-year internal visual and pressure-test intervals, but exceptions and different intervals exist. I would never apply that timetable blindly to an ordinary pickup-bed transfer tank.
For a stationary aboveground storage facility subject to EPA’s SPCC rule, integrity inspections and tests must follow an appropriate industry-standard program and the facility’s Plan. EPA explicitly says the SPCC rule does not impose one universal testing interval; schedule, personnel qualifications, tank design and service matter.
| Situation | Relevant U.S. framework | What I would confirm |
|---|---|---|
| Covered commercial vehicle | FMCSA inspection and maintenance rules | Driver reporting, repairs and records as applicable |
| DOT specification cargo tank | 49 CFR Part 180 | Qualified inspections/tests, marking and due dates |
| Stationary oil storage under SPCC | 40 CFR Part 112 | Applicable Plan and integrity-testing program |
| Workplace storage/dispensing | OSHA rules and applicable fire codes | Approved tanks, safe handling, vents and access |
| Ordinary portable/transfer container | Manufacturer plus applicable transport/site rules | Appropriate design for intended use |
Regulatory note: In the United States, the SPCC aboveground capacity trigger is generally more than 1,320 gallons in aggregate at a qualifying non-transportation-related facility with potential to discharge oil to covered waters. Count applicable containers with capacity 55 gallons or greater, based on rated capacity rather than current fill. Other conditions and exclusions matter.
Worked Example: Inspecting a 12-Truck Service Fleet
Let’s build a fleet example with actual arithmetic rather than vague statements about saving time.
Suppose I manage 12 service trucks, each carrying a 100-gallon diesel transfer tank, plus a yard with three stationary 500-gallon tanks. Assume the company operates 50 weeks a year and budgets 8 minutes per truck per week for a documented, focused fuel-system inspection. Daily walkarounds still occur separately.
First, the time required for this added weekly check is:
12 trucks × 8 minutes × 50 weeks = 4,800 minutes, or 80 labor-hours per year.
At an illustrative loaded labor rate of $30 per hour, that’s $2,400 annually in planned inspection labor. This is a planning assumption, not a vendor quotation or legal inspection requirement.
Next, consider the yard’s stationary capacity: 3 × 500 = 1,500 gallons. That exceeds the 1,320-gallon SPCC aggregate aboveground capacity threshold. If the site is non-transportation-related and has a reasonable potential to discharge oil to covered waters, the facility may be subject to the rule; exemptions and other facts must still be reviewed.
| Planning item | Calculation | Result |
|---|---|---|
| Truck-mounted transfer tanks | 12 × 100 gal | 1,200 gal of nominal truck tank capacity |
| Weekly inspection labor | 12 × 8 min × 50 weeks | 4,800 minutes |
| Annual inspection time | 4,800 ÷ 60 | 80 hours |
| Illustrative inspection labor | 80 × $30 | $2,400 per year |
| Stationary yard storage | 3 × 500 gal | 1,500 gal |
| SPCC capacity comparison | 1,500 − 1,320 | 180 gal over threshold |
I would not automatically add the truck tanks to the stationary storage total. Whether mobile equipment or transfer tanks count depends on the facility’s actual use and the applicable SPCC definitions and exclusions. The 1,500-gallon yard total alone is enough to warrant a detailed applicability review.
Here is the operational benefit of those 80 hours: every week I can identify recurring loose hardware, leaking hose fittings or damaged caps before they become incidents. I don’t put a fictional dollar amount on an avoided spill; the expected value depends on the real risk and consequences.
My Red–Amber–Green Decision Guide
I don’t want a form that merely says “inspection complete.” I want a rule that tells staff what happens next. This is my traffic-light triage, not a substitute for formal defect criteria.
| Status | Example finding | Decision |
|---|---|---|
| RED — Stop | Active leak, structural crack, unsafe mounting, deformed tank, damaged electrical protection or other immediate hazard | Stop transfer/use, isolate safely, notify maintenance and obtain qualified clearance |
| AMBER — Evaluate | Surface coating damage, minor nonstructural corrosion, unclear documentation, recurring staining with no confirmed source | Assign prompt qualified review; do not continue if safety cannot be established |
| GREEN — Continue | No visible defects, approved components present, required inspections current | Record check and continue within approved operating limits |
A borderline finding is never an invitation to call it “green.” If I cannot tell whether a condition compromises containment or safety, I keep the tank out of service until someone qualified resolves it.
The Inspection Record I Would Actually Keep
I use one record per tank or fueling asset instead of one vague “all tanks OK” entry. Each record should include the asset ID, location, tank type, date, inspector, inspection scope, current readings or photos when applicable, findings, risk status, corrective work, responsible owner, and return-to-service approval.
A simple example entry would read: Truck 07 / 100-gallon transfer tank / weekly check / damp fitting at hose swivel / RED / pump isolated / repair ticket 284 / release pending leak-free assessment.
That is more useful than writing “hose problem” without a location or follow-up. It links the observation to an action and keeps the equipment from being released by mistake.
I also keep formal inspection reports and required test documentation in a separate compliance folder tied to the same tank ID. Under applicable SPCC rules, inspection/testing records generally must be retained for three years, and some other regimes require their own records and retention periods. I use the longer applicable retention rule or company policy when appropriate.
If several tanks fail in the same place, I would review the design or procedure rather than just replace the same part repeatedly. Five hose failures beside one mounting bracket might be a routing problem, not five unrelated defective hoses.
How I Turn Inspection Results Into a Maintenance Plan
The useful part of an inspection program begins after the form is saved. Every unresolved defect needs a clear owner and decision.
- Log the defect against the tank ID. Record photos and a precise location instead of a broad description.
- Assign a stop/use decision. A safety-critical defect must not remain in service while waiting for a convenient repair slot.
- Open a corrective work order. Include the component, suspected cause and qualifications needed.
- Use approved parts and procedures. Do not invent tank repairs, bypass vents, or substitute incompatible seals.
- Verify the repair. Require the appropriate inspection or testing before return to service.
- Look for patterns. Track recurring defects by tank model, road assignment, mounting method and age.
For fleets deciding whether to keep refueling internally, see Cost of Operating a Diesel Transfer Tank vs. Fuel Delivery Services. Inspection labor, repair downtime and fuel loss belong in that operational comparison.
Frequently Asked Questions
How often should a diesel transfer tank be inspected?
I recommend a short visual check before use and a documented maintenance cadence suited to the equipment. But there is no universal legal weekly or monthly interval for every transfer tank. Use the manufacturer, tank configuration, duty cycle, applicable rules and qualified inspector’s recommendations to set the required schedule.
Is a visual walkaround enough for a fleet diesel tank?
Not always. Visual checks catch obvious leaks and damage, but hidden corrosion, structural concerns, regulated cargo tanks or covered stationary storage may require specialist examinations and integrity testing. Drivers should not perform pressure or internal tank tests without proper qualifications and procedures.
What defect should immediately remove a tank from service?
An active leak, crack, major deformation, unsafe mounting or compromised fuel connection is a clear reason to stop and seek assessment. If the finding is uncertain but may affect safe containment, I would also hold the asset until reviewed.
Do fuel tanks on trucks follow the same rules as transfer tanks?
No. The truck’s engine fuel tank, a separate dispensing transfer tank and a DOT specification cargo tank can have different rules. Identify the tank and service before applying inspection or transport requirements.
Do fleet managers need to inspect tank vents?
Yes, as part of a safe visual inspection. Look for a damaged, missing or visibly obstructed approved vent arrangement. Do not loosen the cap, improvise a vent hole or pressure-test the tank to diagnose it.
What documents should I keep for an inspection audit?
I would retain the tank inventory, inspection logs, issue photographs, work orders, repair approvals, applicable test certificates, and next-due dates. Match retention to the specific regulation and your company policy rather than assuming one period fits all fleets.
Final Verdict: Make Inspections Predictable, Not Complicated
The best diesel tank inspection checklist is one your team actually uses—and one that leads to a clear decision when something goes wrong.
I would start with identifying each tank, running a safe visual check, documenting recurring defects, escalating structural or leakage concerns, and tracking formal inspections separately. That approach helps protect equipment, people, fuel inventory and the environment without pretending every tank follows one legal timetable.
For the next question in this maintenance sequence, read Do Diesel Transfer Tanks Need to Be Vented? and Diesel Transfer Pump Options and Selection to check two systems that strongly affect day-to-day tank reliability.